
We recently received a task that required development on a Windows-based system.
It's been a long time! It's been several years since we last used Windows.
We tried a few methods and finally settled on using PowerShell to set up the Python environment.
We initially thought about using WSL for configuration, but that would turn the environment into a Linux environment... (?)
If we already have a Linux environment at hand, why bother configuring one on Windows?
Operating Environment
We're using the virtual environment tool provided by Mac: Parallels Desktop.
With Parallels Desktop, we can smoothly run a Windows system on Mac, and the currently installed one is Windows 11.
The Apple M1 chip is ARM-based, and it faced many compatibility issues when it was first launched, but it has improved a lot over the years.
Installing Chocolatey
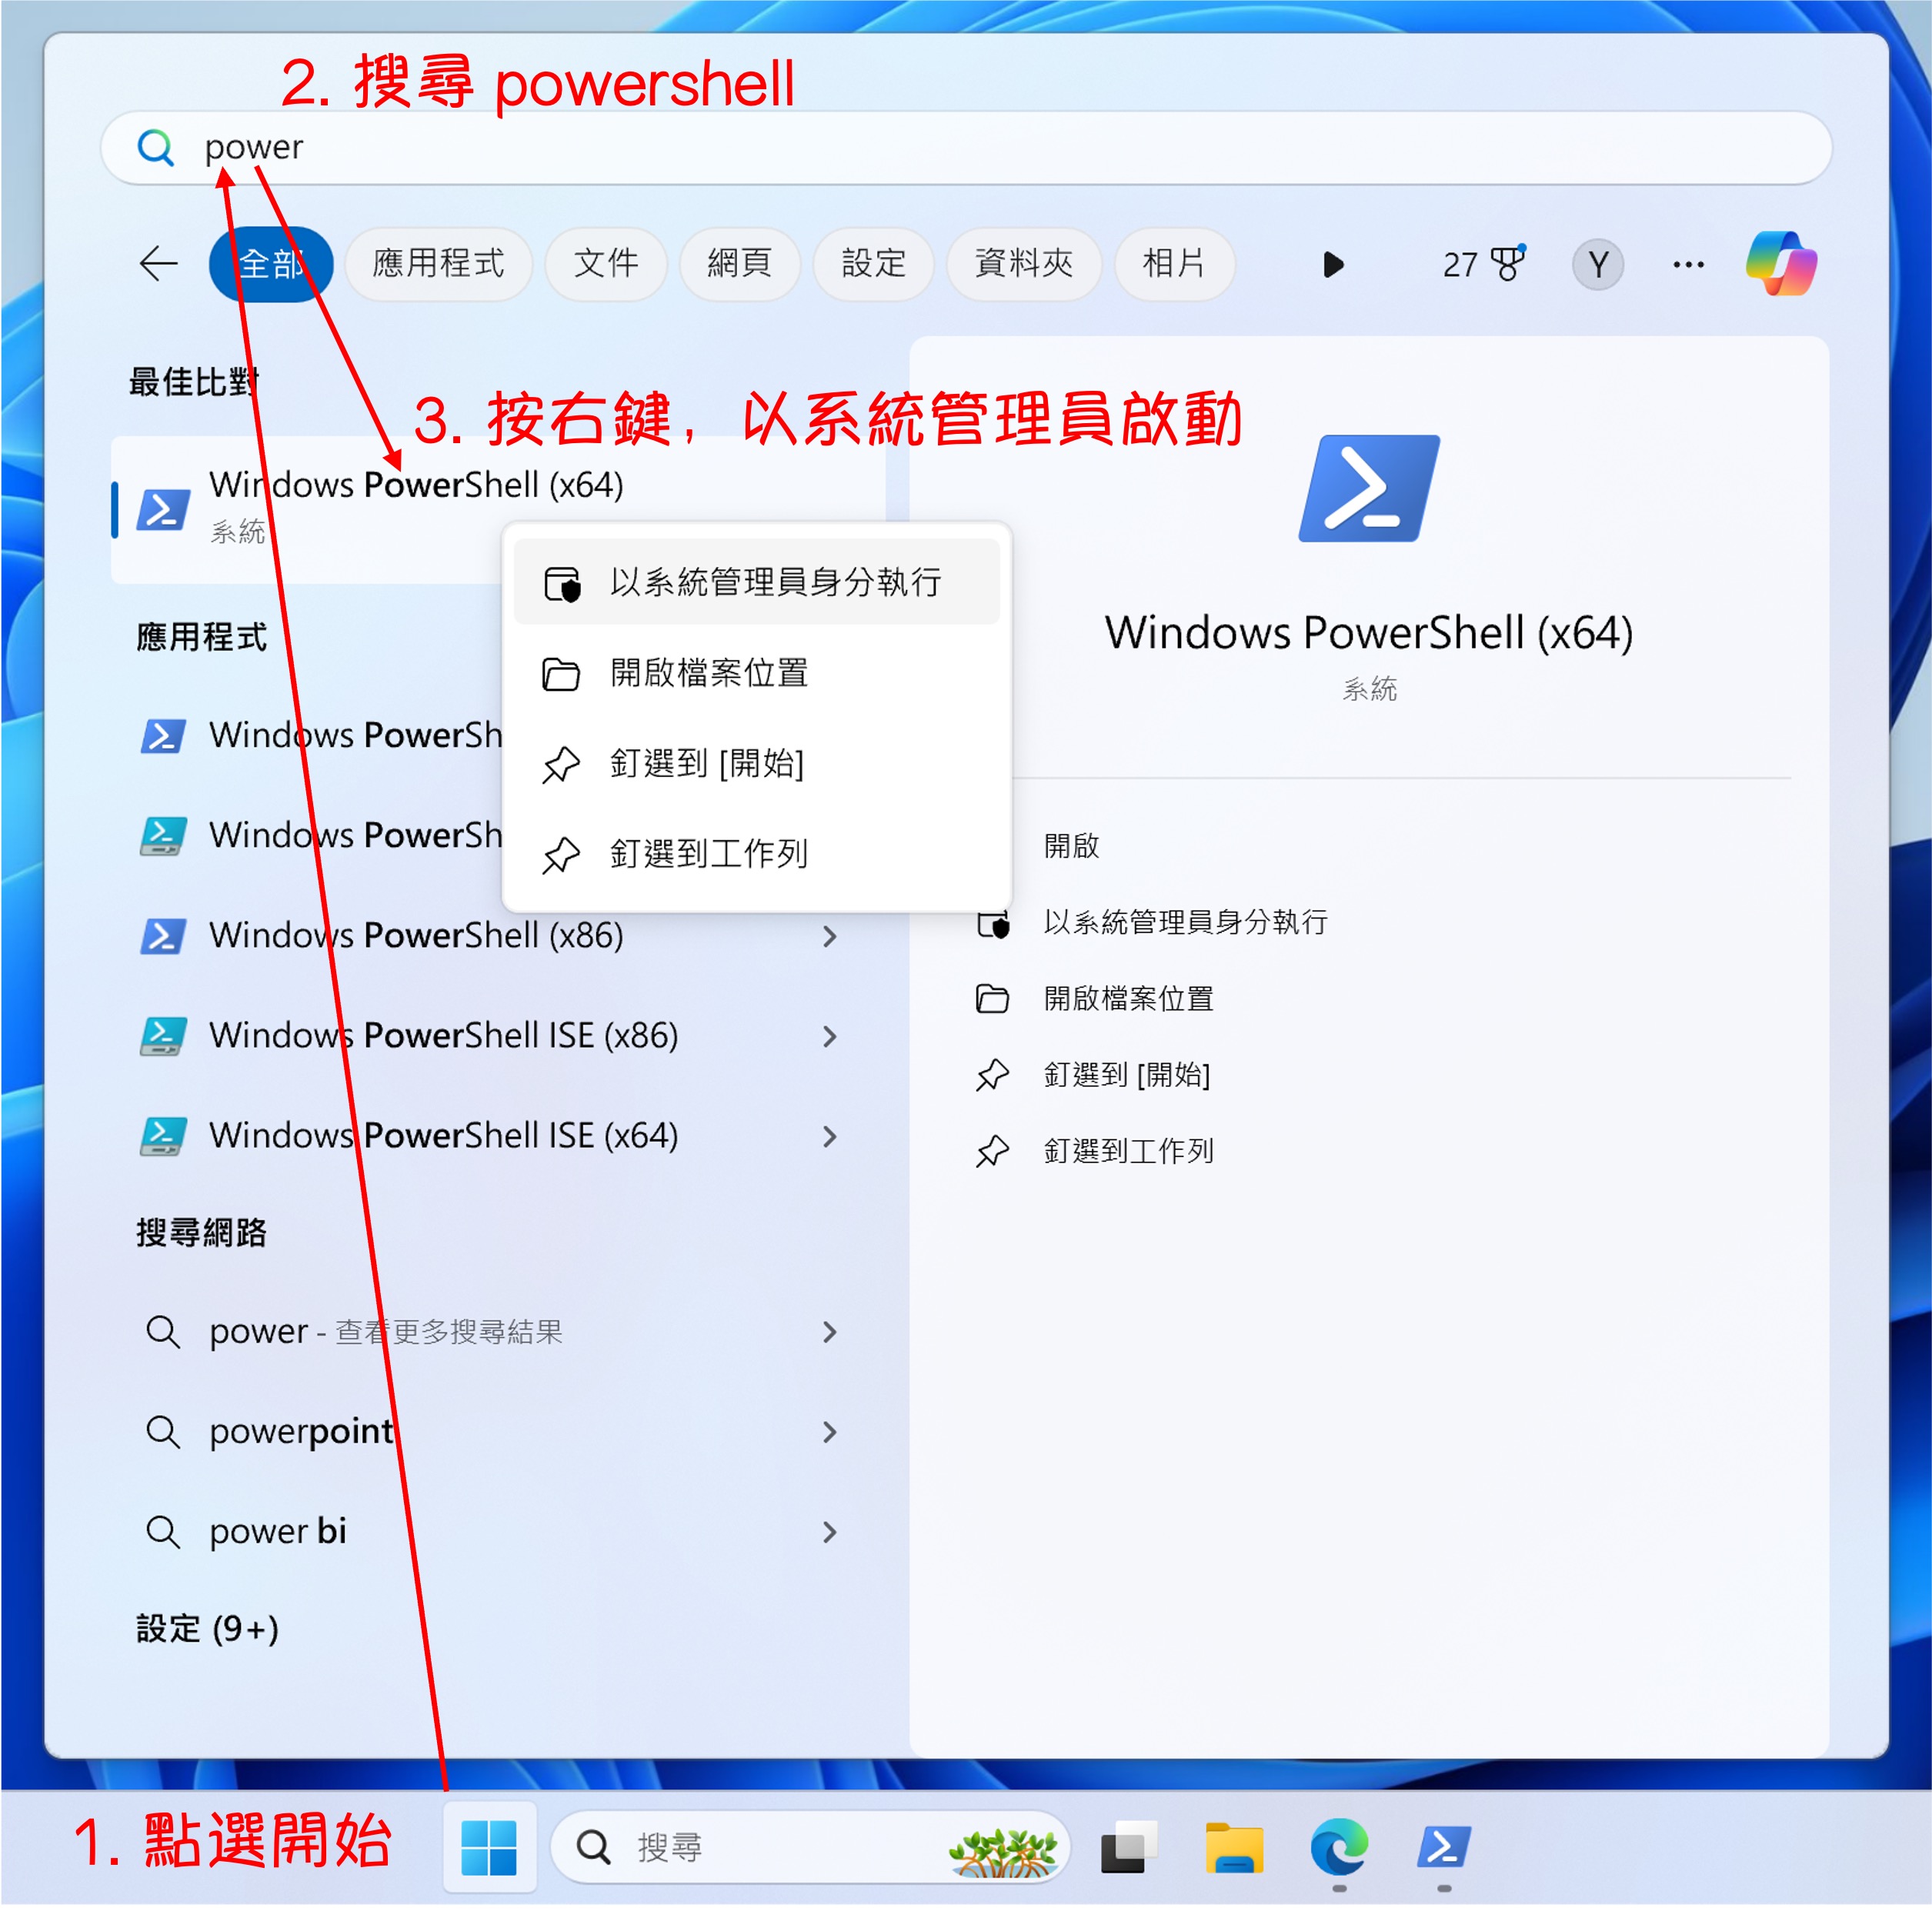
First, we need to launch PowerShell.
Chocolatey is a package manager for Windows. It automates the process of installing, upgrading, and managing software using NuGet and PowerShell technologies. It's similar to apt-get or yum on Linux, allowing Windows users to manage software in a simple and consistent way.
Installing Chocolatey is relatively simple. Just run the following command in PowerShell with administrative privileges:
Set-ExecutionPolicy Bypass -Scope Process -Force; [System.Net.ServicePointManager]::SecurityProtocol = [System.Net.ServicePointManager]::SecurityProtocol -bor 3072; iex ((New-Object System.Net.WebClient).DownloadString('https://community.chocolatey.org/install.ps1'))
After installation, enter the following command to verify if Chocolatey was installed successfully:
choco -v
If you see the version number of Chocolatey, it means the installation was successful.
Here's what the above command does:
-
Set-ExecutionPolicy Bypass -Scope Process -Force:
- This command sets the PowerShell execution policy.
Set-ExecutionPolicyis used to change the execution policy to allow or disallow the execution of PowerShell scripts.Bypassmeans bypassing all execution policies without any restrictions.-Scope Processmeans applying this change only to the current PowerShell session, not affecting the entire system.-Forceis used to forcefully execute this operation without prompting for confirmation.
-
[System.Net.ServicePointManager]::SecurityProtocol = [System.Net.ServicePointManager]::SecurityProtocol -bor 3072:
- This command sets the network security protocol.
[System.Net.ServicePointManager]::SecurityProtocolis used to get or set the protocol type.-bor 3072adds the TLS 1.2 (3072) protocol to the existing protocols.-boris a bitwise operator, indicating a bitwise OR operation, allowing multiple protocols to be enabled simultaneously.
-
iex ((New-Object System.Net.WebClient).DownloadString('https://community.chocolatey.org/install.ps1')):
- This command downloads and executes the Chocolatey installation script.
iexis shorthand forInvoke-Expression, used to execute the content passed to it as a string.New-Object System.Net.WebClientis used to create a new WebClient object, which is used for downloading data..DownloadString('https://community.chocolatey.org/install.ps1')is used to download the script content from the specified URL.- Overall, the command
iex ((New-Object System.Net.WebClient).DownloadString('https://community.chocolatey.org/install.ps1'))downloads and immediately executes the PowerShell script located at 'https://community.chocolatey.org/install.ps1', which is responsible for installing Chocolatey.
In simple terms, the purpose of this command is: temporarily set the PowerShell execution policy to allow script execution, configure the network security protocol to support TLS 1.2, and then download and execute the Chocolatey installation script.
Common Chocolatey Commands:
- Install
choco install <packageName> - Upgrade
choco upgrade <packageName> - List installed packages
choco list --localonly - Uninstall
choco uninstall <packageName>
Installing git
After installation, continue running PowerShell as an administrator, and execute the following command to install Git:
choco install git -y
After installation, enter the following command to verify if Git was installed successfully:
git --version
# >>> git version 2.45.2.windows.1
Installing Python
We use pyenv to manage Python versions.
Although there are many choices on the market, such as Anaconda, Miniconda, WinPython, etc., we still chose pyenv.
Because we often develop on Linux, seeing pyenv feels familiar.
Installing and using pyenv on Windows is not usually straightforward because pyenv is designed for Unix-like environments. However, you can use the pyenv-win project, which is a Windows port of pyenv.
Follow these steps:
Step 1: Installing pyenv-win
Download the pyenv-win project:
Invoke-WebRequest -UseBasicParsing -Uri "https://raw.githubusercontent.com/pyenv-win/pyenv-win/master/pyenv-win/install-pyenv-win.ps1" -OutFile "./install-pyenv-win.ps1"; &"./install-pyenv-win.ps1"
If you encounter any UnauthorizedAccess errors as shown below, please launch Windows PowerShell with the "Run as Administrator" option and execute:
Set-ExecutionPolicy -ExecutionPolicy RemoteSigned -Scope LocalMachine
After completion, rerun the installation command above.
Step 2: Verify Installation
-
Restart PowerShell:
- Close and reopen the PowerShell window to apply the environment variable changes.
-
Check
pyenvinstallation:-
Enter the following command to check the
pyenvversion:pyenv --version
-
Step 3: Use pyenv to install Python versions
-
View available Python versions:
-
List all available Python versions with the following command:
pyenv install --list
-
-
Install a specific Python version:
-
For example, to install Python 3.10.11:
pyenv install 3.10.11
-
Set a global Python version:
-
This step is not necessary, but if you want to use the same Python version across all shells, you can set the installed Python version as the global default:
pyenv global 3.10.11
-
-
Verify Python installation:
-
Enter the following command to verify if Python was installed successfully:
python --version
-
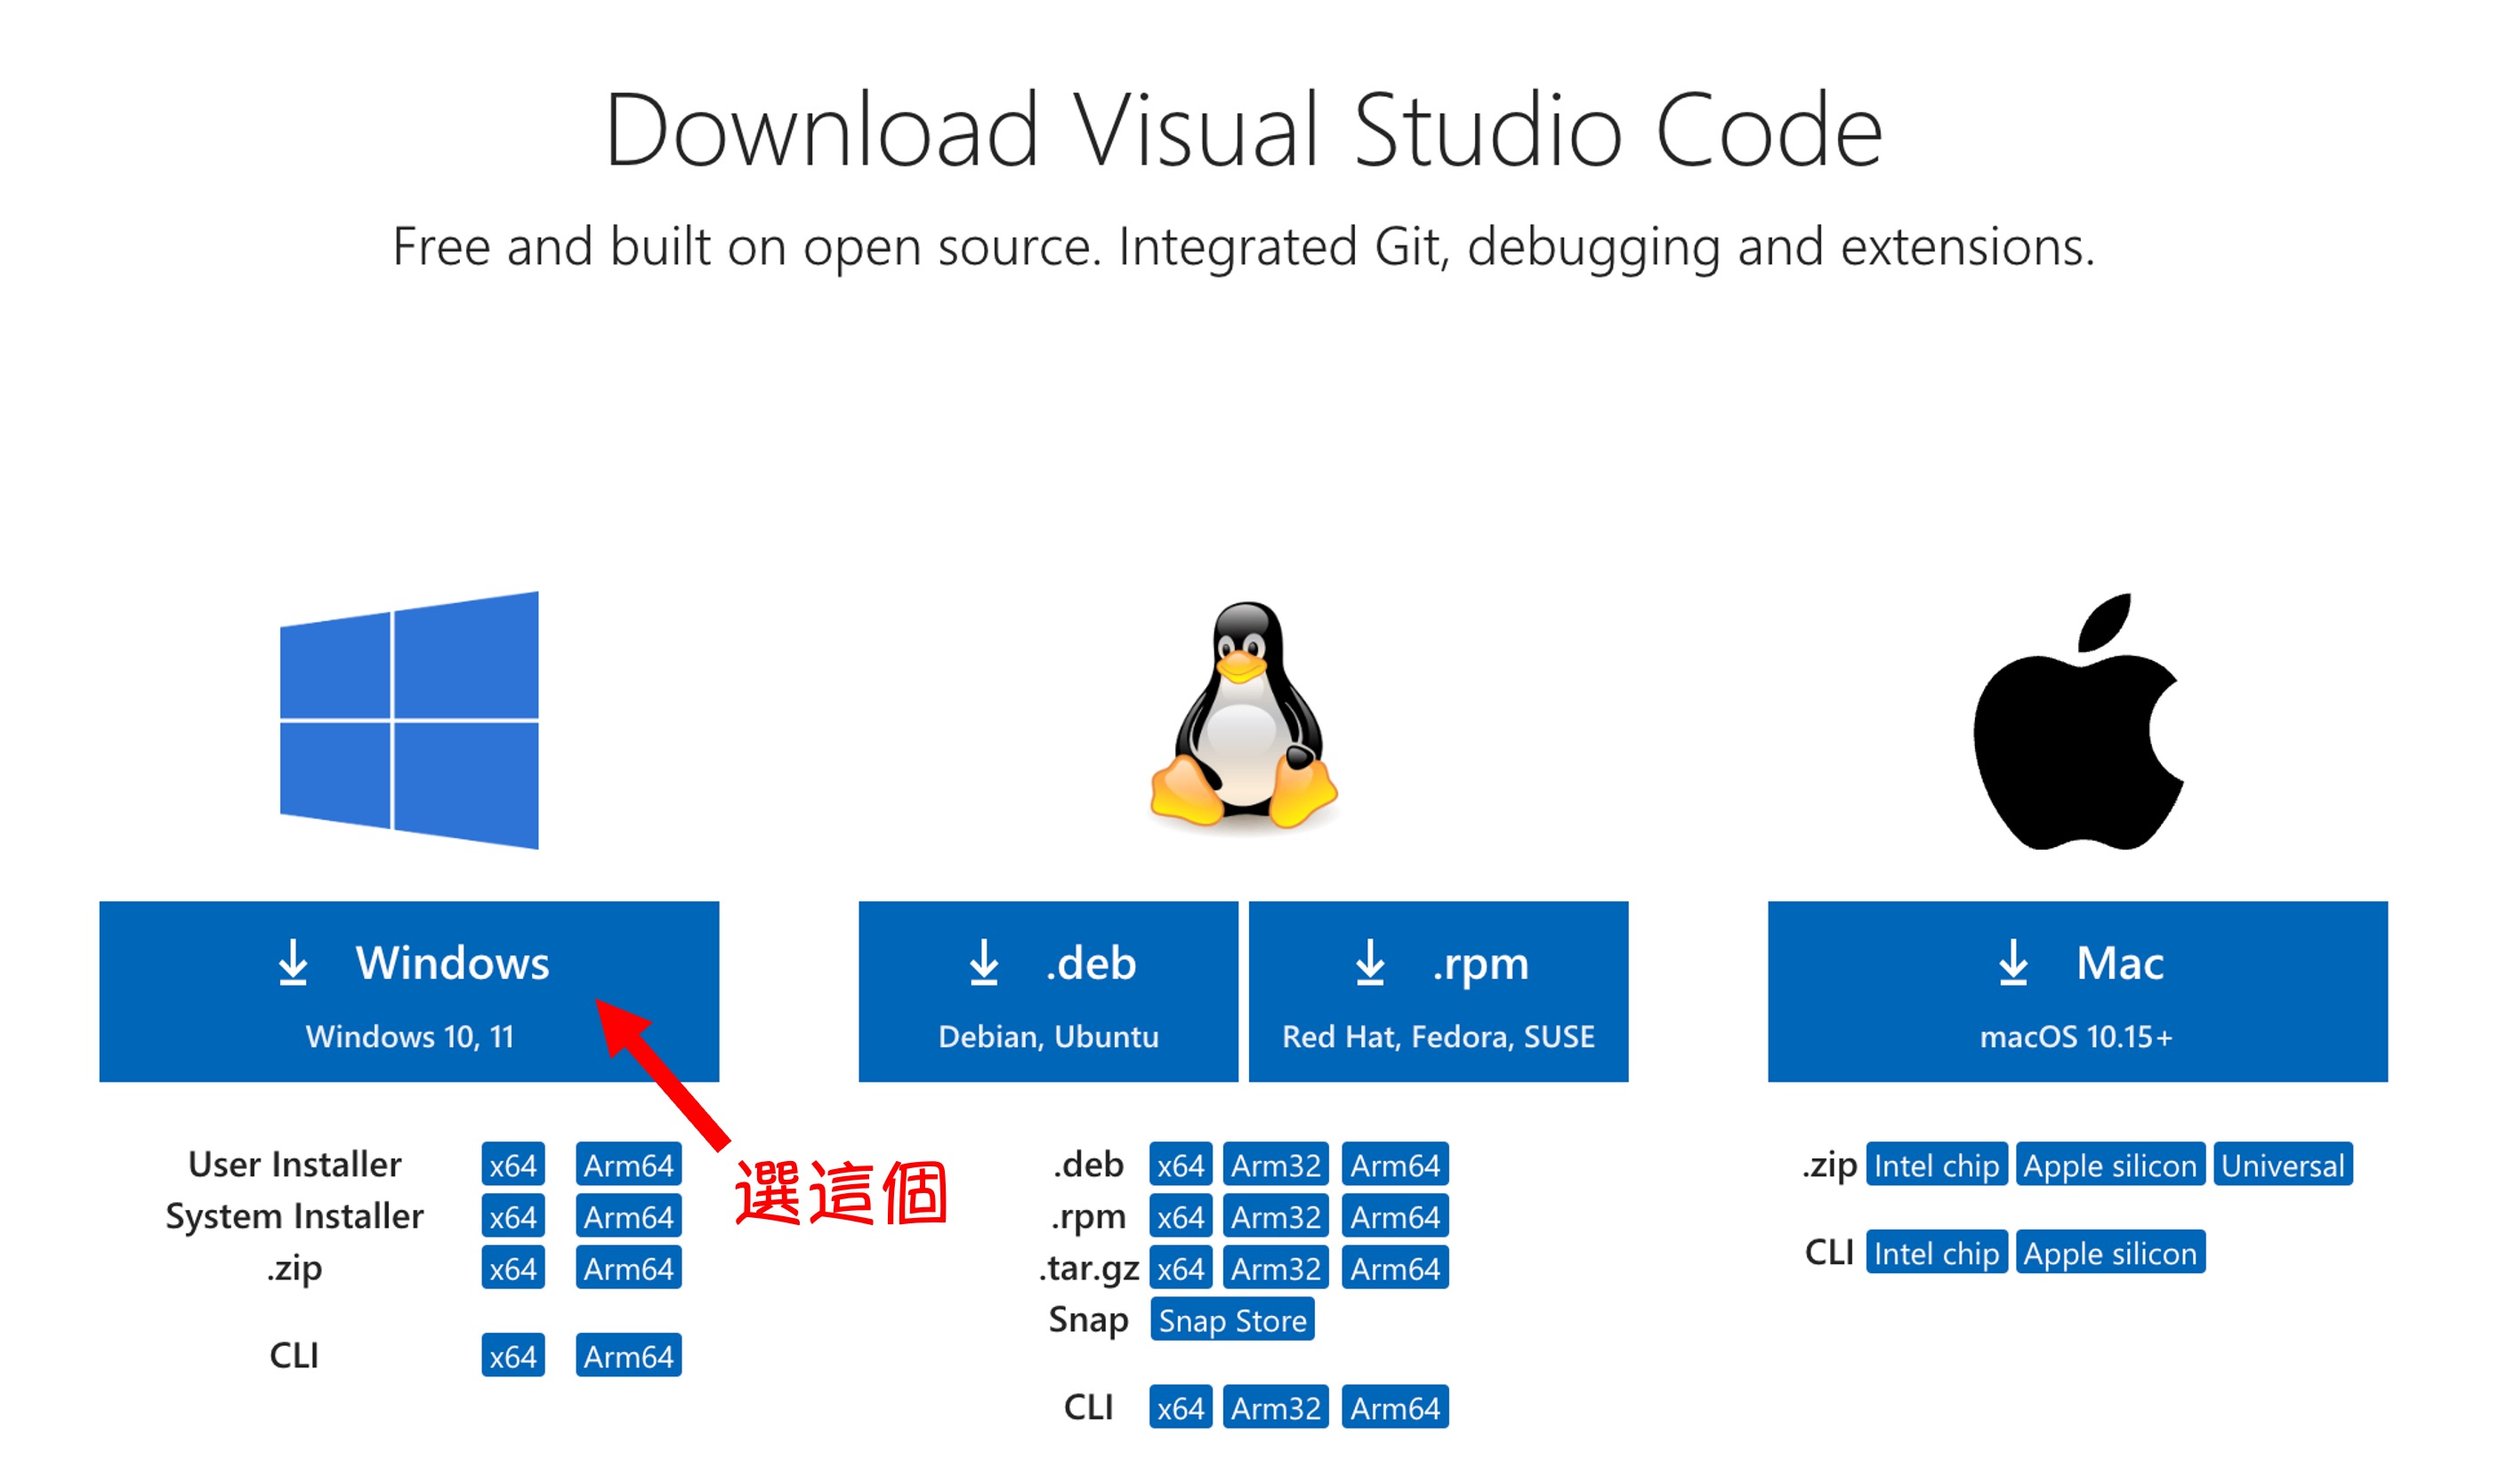
Installing VS Code
Finally, we install Visual Studio Code as our development tool.
Here, we'll go to the VS Code official website to download the installer and then proceed with the installation.
After installation, we want to be able to use the code command directly in PowerShell to open VS Code.
So, we need to add the installation path of VS Code to the environment variables. Copy the following path:
C:\Users\your_user_name\AppData\Local\Programs\Microsoft VS Code\bin
Remember to replace your_user_name with your username.
Side Note
Actually, we find the PowerShell display screen really hard to look at.
For this part, we suggest using oh-my-posh to beautify the appearance of PowerShell.
But this part is not the focus of this article. Interested readers can check out:
Conclusion
Through PowerShell, we can quickly set up the Python environment and install development tools.
Of course, the above only covers the most basic configurations, leaving this article as a reference. Your support keeps my AI & full-stack guides coming. From idea to launch—efficient systems that are future-ready. Need a tech partner or custom solution? Let's connect.☕ Fuel my writing with a coffee
![]()
![]()
AI / Full-Stack / Custom — All In
All-In Bundle
🚀 Ready for your next project?