Model Design
A comprehensive model functionality is not achieved overnight; it requires multiple iterations of adjustments and designs.
First Generation Model
The first-generation model, our earliest version, is divided into four main parts:
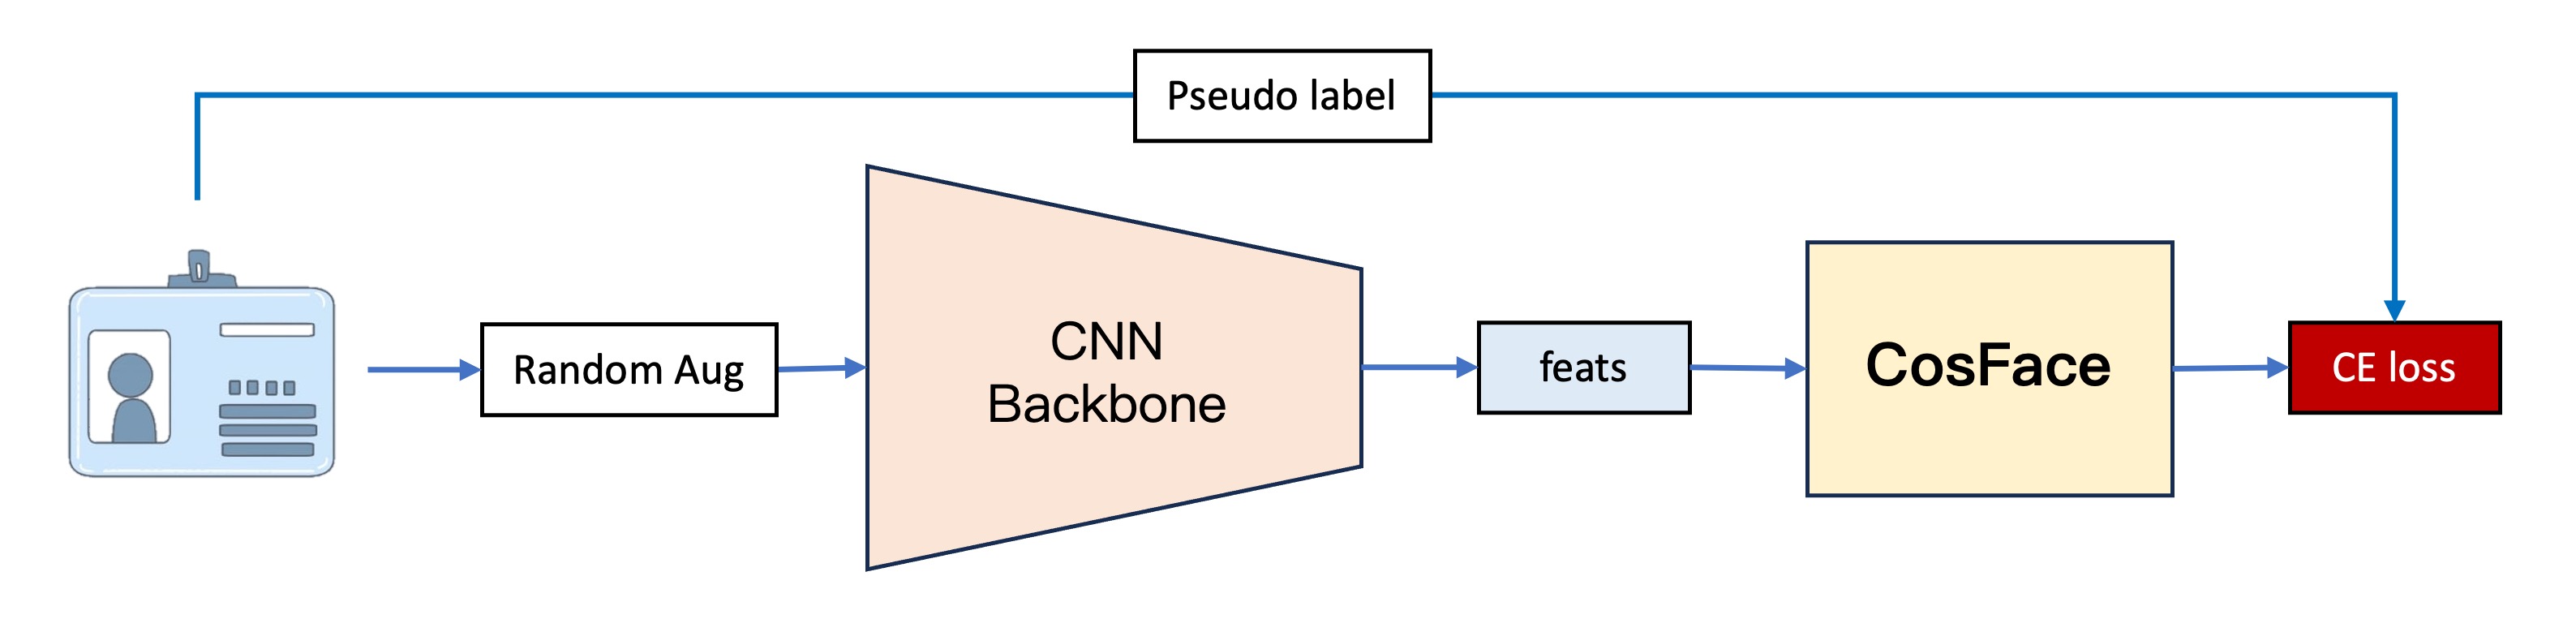
1. Feature Extractor
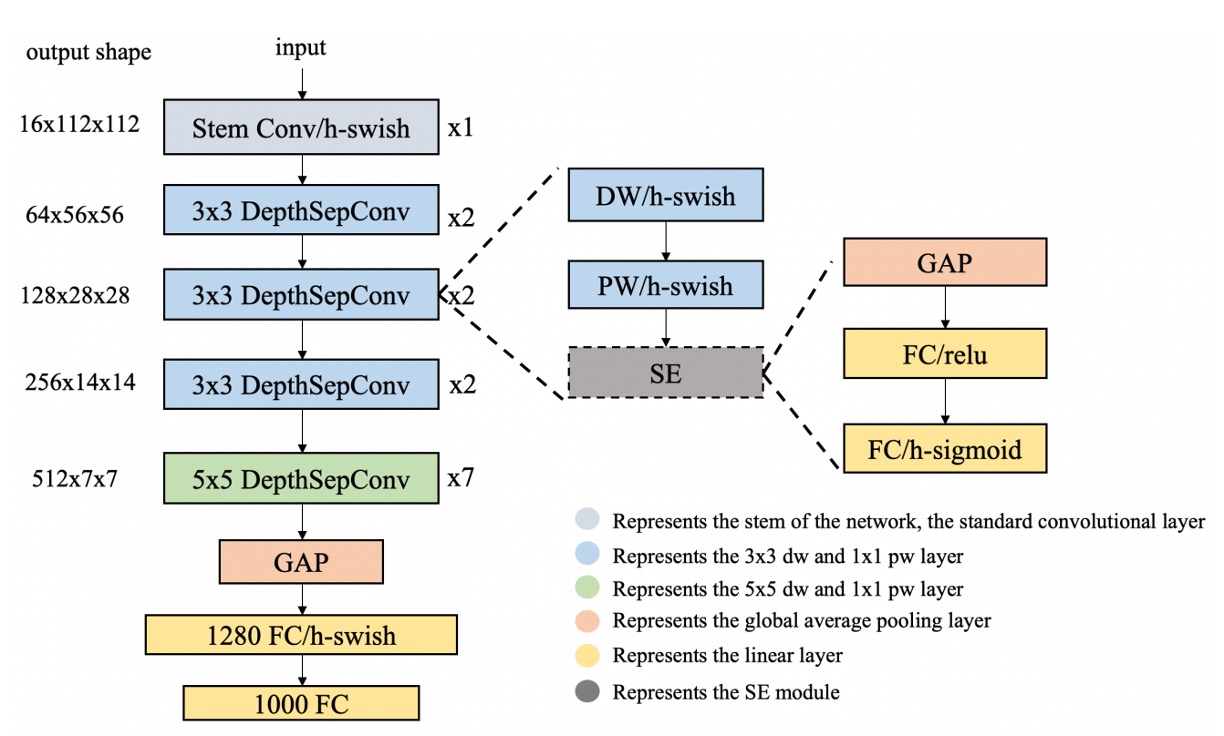
This part is primarily responsible for converting images into vectors. Here, we utilize PP-LCNet as the feature extractor. Given input images of size 128 x 128 RGB, the feature extractor outputs a 256-dimensional vector.
2. CosFace
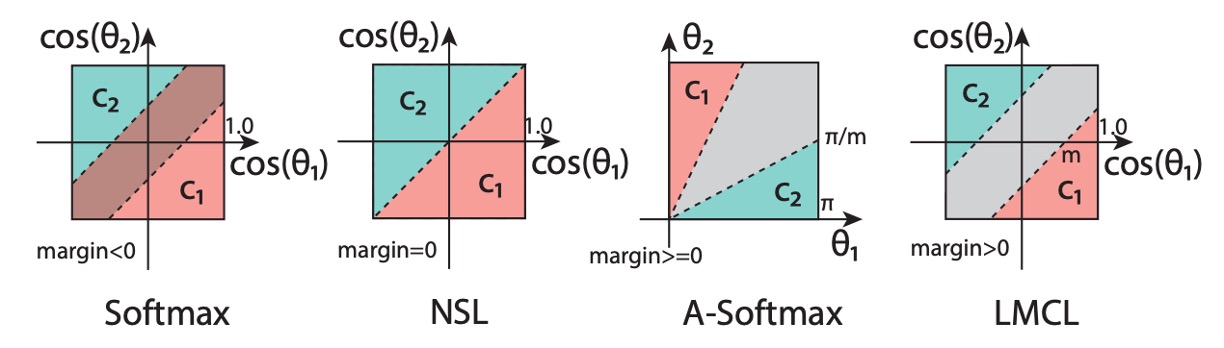
Since we were keen to test the effectiveness of metric learning from the outset, we bypassed the implementation of traditional classifiers and directly adopted the method of CosFace. However, we won't delve deeply into margin-based methods here. If needed, we can dedicate a separate topic in our paper readings section to specifically introduce relevant advancements.
3. Dataset
To train the model, we developed a simple web crawler to fetch images of documents from the internet. We collected images from over 650 different types of documents, with the majority being credit cards from various banks. The dataset can be found here.
4. Training
We used PyTorch for training the model, with each individual image treated as a separate class. This design choice stemmed from our desire for the model to accurately identify differences among various documents, even subtle ones.
This approach raised a question regarding the large number of classes and limited original data (only one image per class). Thus, data augmentation techniques were employed to increase the dataset size.
We opted for Albumentations, a highly effective data augmentation module, to rapidly expand the dataset, which we also recommend to others.
While the first-generation model validated our initial concept, practical application revealed some issues:
-
Stability
In real-world testing scenarios, we found the model lacked stability and was susceptible to environmental changes. Distortions during document corrections significantly affected the model's performance. Given that document distortions are inevitable, a stable model should not be unduly affected by slight deformations.
-
Performance
Similar documents often confused the model during real-world testing, indicating insufficiently discriminative features learned by the model, hindering its ability to differentiate between different documents effectively.
Combining these observations, our conclusion was: the model was overfitting!
Second Generation Model
The second-generation model builds upon the first generation with several improvements:
1. Increased Data
Unable to acquire more document images, we pondered: why not treat data from other open-source datasets as documents? Hence, we included data from the Indoor Scene Recognition dataset by MIT, containing images of 67 different indoor scenes, totaling around 15,620 images. This greatly diversified our "document" types.
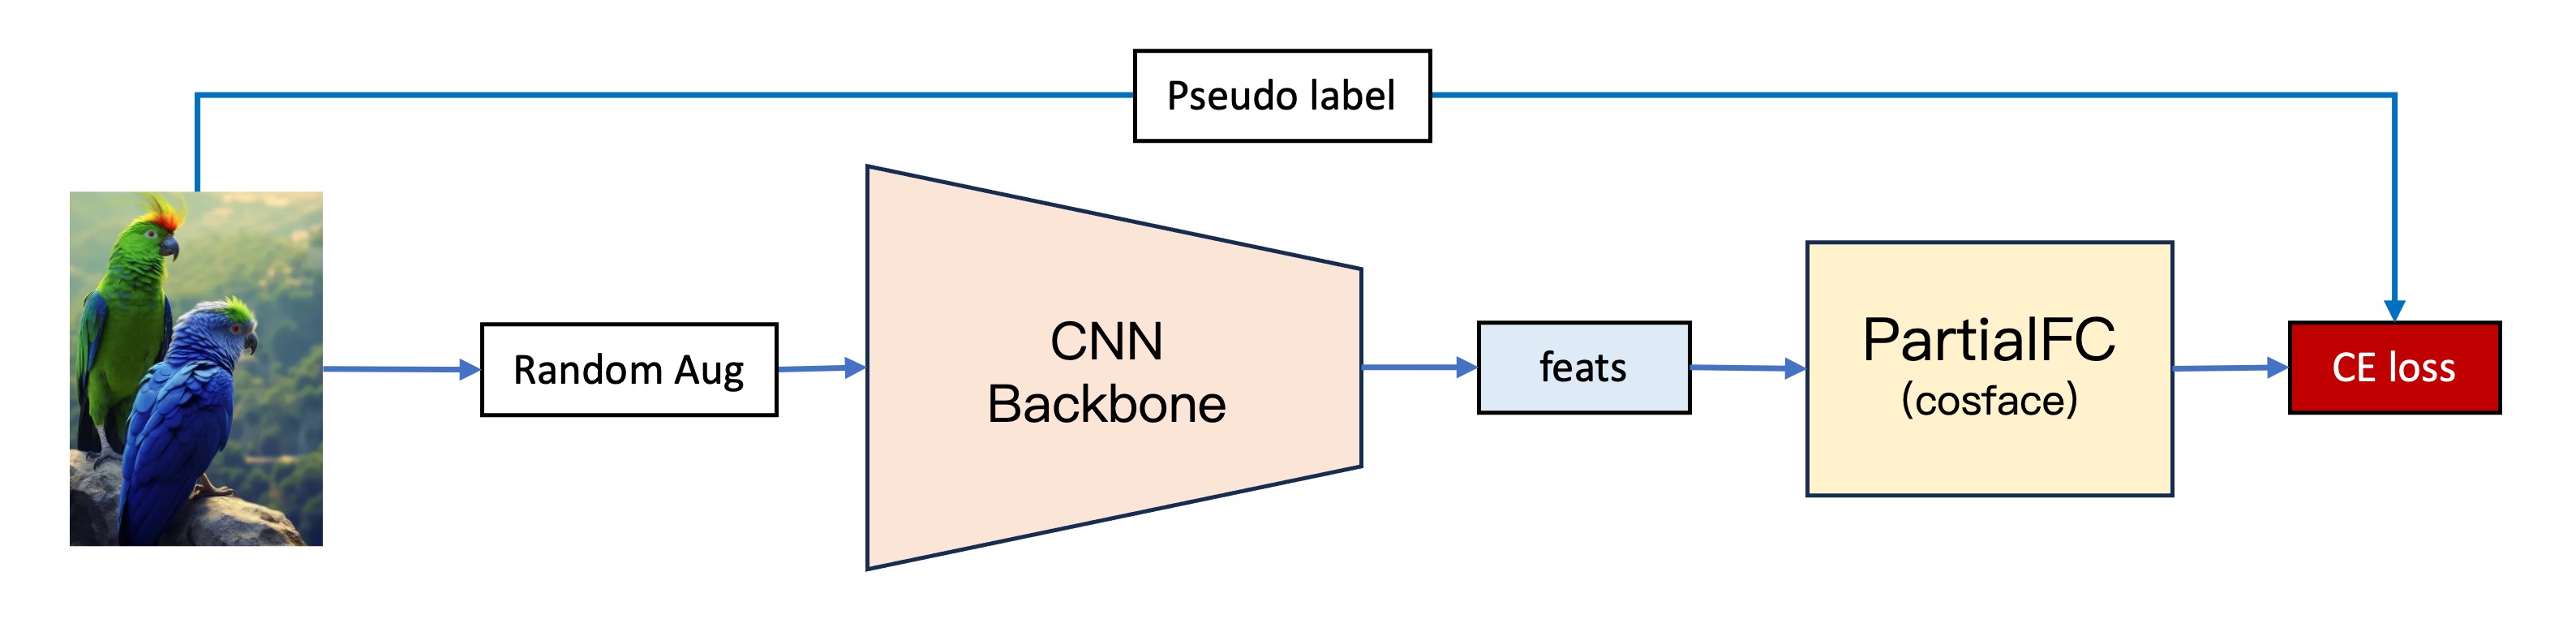
2. Switched from CosFace to PartialFC
As the number of classes increased, issues with a large classification head became apparent. In the field of facial recognition, a method called PartialFC is well-known. The research team found that in learning facial features, the importance of negative classes (i.e., non-target classes) within Softmax functions was not as high as previously thought. Even when training with only 10% of randomly sampled classes, compared to using all classes, accuracy did not significantly decrease.
This is a godsend for us retail traders with limited computing power! We extend our special thanks to insightface for their implementation. If you have the time, consider giving them a star.
3. More Data
Despite increasing the dataset size, overfitting persisted. Hence, we subjected each image to rotations, flips, and crops, generating "24" categories per image. For instance:
- Original image
- Rotated 90 degrees
- Rotated 180 degrees
- Rotated 270 degrees
- Horizontal flip
- Horizontal flip + rotated 90 degrees
- Horizontal flip + rotated 180 degrees
- Horizontal flip + rotated 270 degrees
- Original image (upper half)
- Original image (upper half) + rotated 90 degrees
- Original image (upper half) + rotated 180 degrees
- ......
Thus, we transformed each original image into (15,620 + 650) x 24 = 390,480 images (categories).
4. More and More Data!
While overfitting reduced, it remained unresolved. Clearly, relying solely on data from Indoor Scene Recognition was insufficient. We needed greater diversity to support the model's learning. Thus, we replaced Indoor Scene Recognition with ImageNet-1K, a massive dataset containing images from 1,000 different categories, totaling approximately 1,281,167 images.
Besides the 1K version, there's also a 21K version with around fourteen million images.
Finally, with class expansion to over 1.28 million, the overfitting issue was resolved.
Third Generation Model
Striving for a more stable model, we experimented with new methods:
1. CLIP
Despite being several years since OpenAI introduced CLIP, its relevance continues across various domains. We believed integrating some CLIP features into our existing architecture could enhance model stability. Our hypothesis was that CLIP, having seen a broader range of images, could provide more robust feature vectors. Thus, aligning the features learned by our model with CLIP's seemed promising.
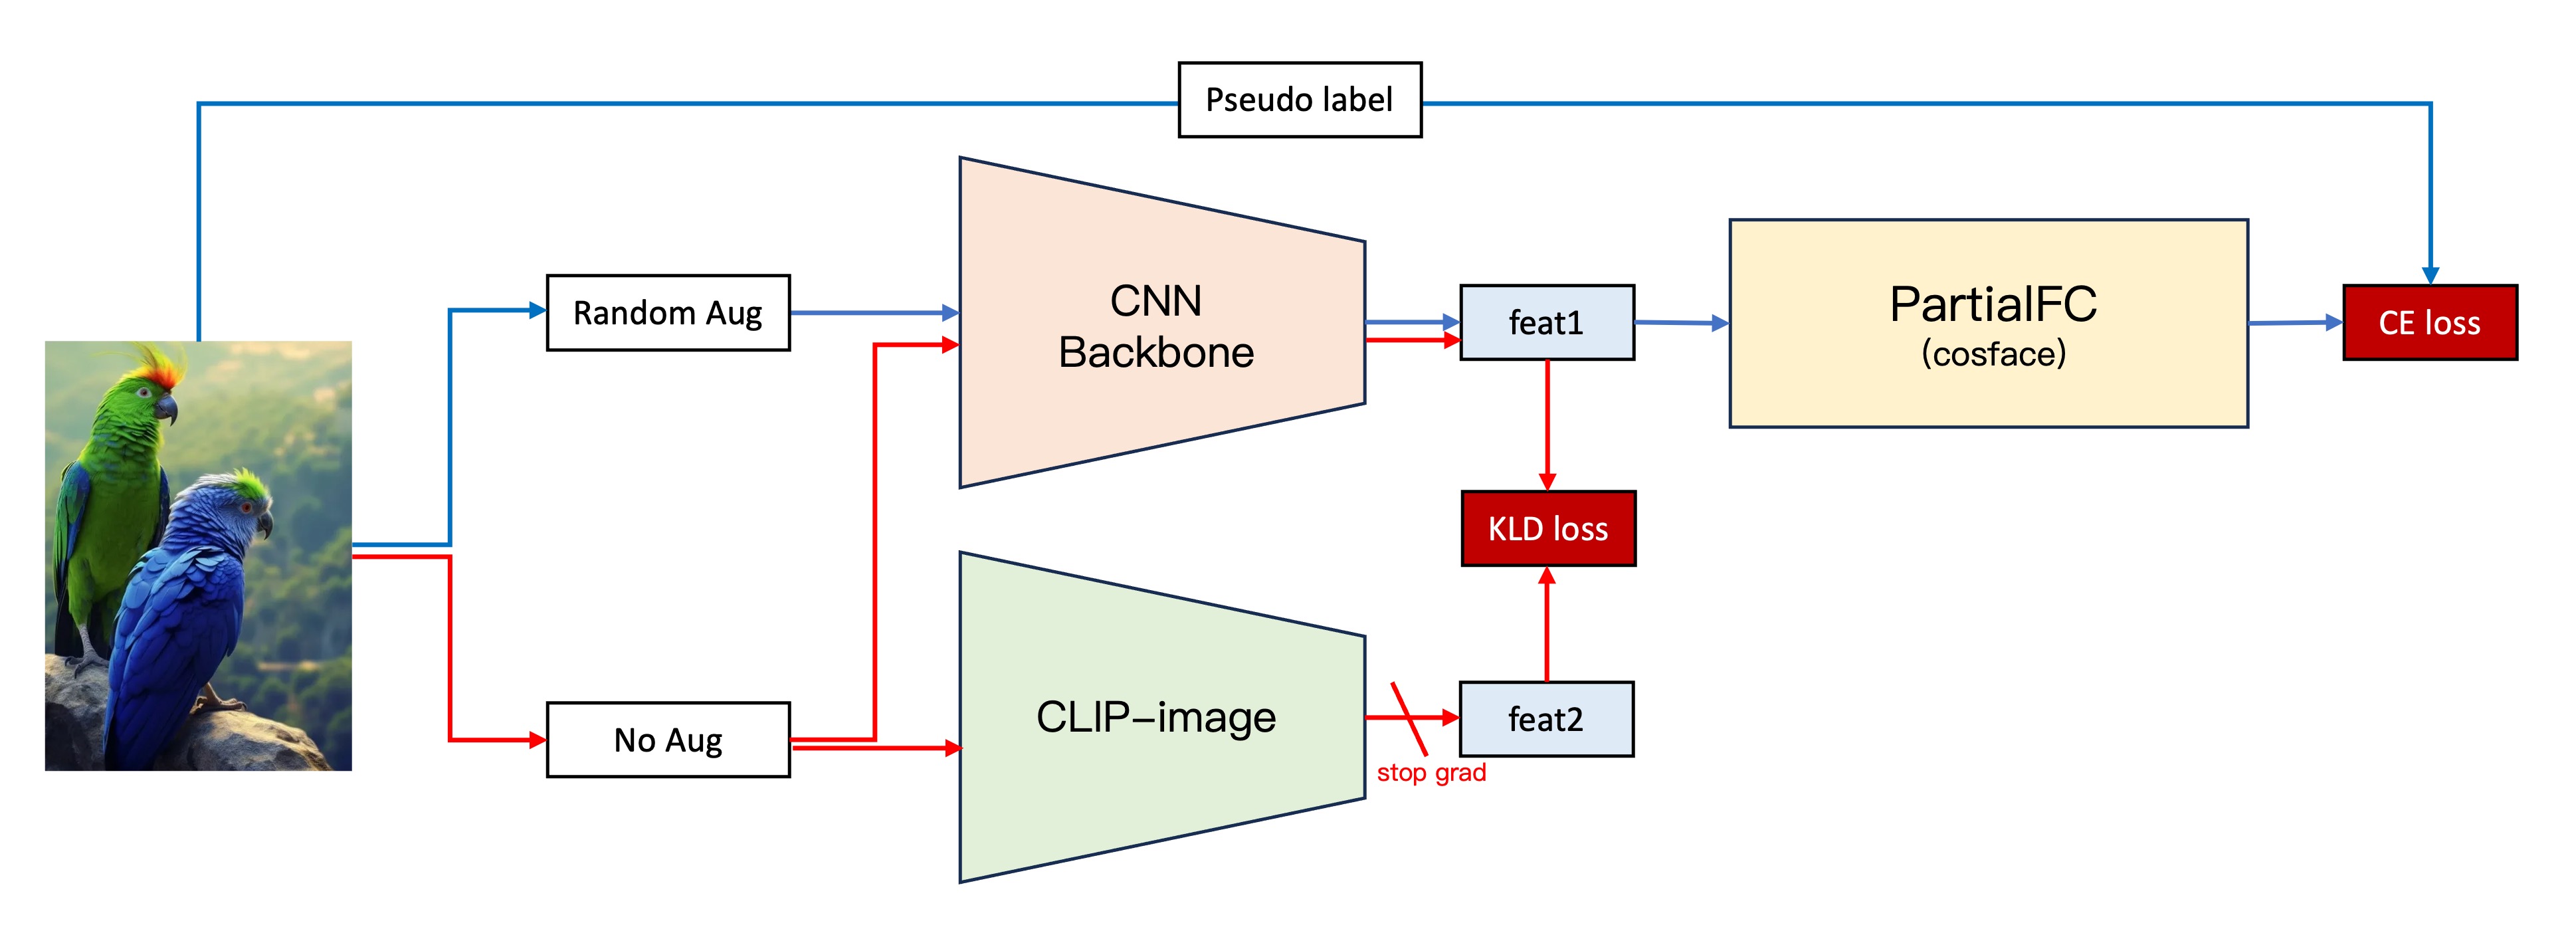
To test our hypothesis, we designed the following process:
- Maintain the second-generation architecture.
- Obtain image feature vectors (Feature 1) by inputting original images into our CNN backbone.
- Simultaneously, input the original images into the CLIP-Image branch to obtain image feature vectors (Feature 2).
- Calculate the KLD loss (a loss function considering vector similarity) between Feature 1 and Feature 2.
- Incorporate the KLD loss into the existing loss function, freezing the CLIP-Image branch parameters and training only the second-generation architecture branch.
This attempt yielded unprecedented success, significantly enhancing our model's stability and improving validation dataset performance by nearly 5 percentage points.
2. Normalization Layer Stacking
In the second-generation model, we experimented with various normalization layers, including BatchNorm, LayerNorm, and InstanceNorm. Unlike facial recognition models, where BatchNorm typically yields superior results, in our experiments, LayerNorm performed better.
However, in a serendipitous experiment, we stumbled upon a better normalization approach:
- Simultaneous use of BatchNorm and LayerNorm!
Forgetting to remove this during training unexpectedly improved scores by 5 percentage points.
self.embed_feats = nn.Sequential(
    nn.Linear(in_dim_flatten, embed_dim, bias=False),
    nn.LayerNorm(embed_dim),
    nn.BatchNorm1d(embed_dim),
    nn.Linear(embed_dim, embed_dim, bias=False),
    nn.LayerNorm(embed_dim),
    nn.BatchNorm1d(embed_dim),
)
After thorough investigation, we confirmed that this behavior led to the improvement, prompting us to adopt this approach.
Conclusion
The third-generation model exhibits significant improvements in both stability and performance. We are pleased with its performance and have achieved satisfactory results in practical applications. We believe the milestone tasks for this mission are completed, and we present this series of results here, hoping they will be helpful to others.