Quick Start
Starting is always the hardest part, so we need a simple beginning.
Start with a String
First, define a basic declaration and then you can start using it.
from wordcanvas import WordCanvas

gen = WordCanvas(return_infos=True)
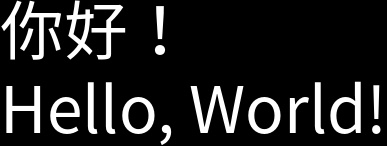
By using all default settings, simply call the function to generate the text image.
text = "你好!Hello, World!"
img, infos = gen(text)

print(img.shape)
# >>> (67, 579, 3)

print(infos)
# {'text': '你好!Hello, World!',
#  'bbox(xyxy)': (0, 21, 579, 88),
#  'bbox(wh)': (579, 67),
#  'offset': (0, -21),
#  'direction': 'ltr',
#  'background_color': (0, 0, 0),
#  'text_color': (255, 255, 255),
#  'spacing': 4,
#  'align': 'left',
#  'stroke_width': 0,
#  'stroke_fill': (0, 0, 0),
#  'font_path': 'fonts/NotoSansTC-Regular.otf',
#  'font_size_actual': 64,
#  'font_name': 'NotoSansTC-Regular',
#  'align_mode': <AlignMode.Left: 0>,
#  'output_direction': <OutputDirection.Remain: 0>}

In default mode, the output image size depends on:
- Font size: The default is 64, and the image size increases with the font size.
- Text length: The longer the text, the wider the image. The exact length is determined by
pillow. - The output information in
infoscontains all the drawing parameters, including text, background color, text color, etc. - To output only the image, set
return_infos=False, which is also the default value.
Specify a Custom Font
Use the font parameter to specify your preferred font.
from wordcanvas import WordCanvas

# Do not specify return_infos, which defaults to False and won't return infos
gen = WordCanvas(
    font_path="/path/to/your/font/OcrB-Regular.ttf"
)

text = 'Hello, World!'
img = gen(text)

If the font does not support the input text, tofu characters will appear.
text = 'Hello, 中文!'
img = gen(text)
How to check if a font supports characters:
Currently, I don't have this need, so I left a basic method. This is a simple check, and it only checks one character at a time, so it needs to iterate through all characters. If you have other needs, feel free to expand it.
from wordcanvas import is_character_supported, load_ttfont

target_text = 'Hello, 中文!'

font = load_ttfont("/path/to/your/font/OcrB-Regular.ttf")

for c in target_text:
    status = is_character_supported(font, c)

# >>> Character '中' (0x4e2d) is not supported by the font.
# >>> Character '文' (0x6587) is not supported by the font.
Adjust Image Size
Use the output_size parameter to adjust the image size.
from wordcanvas import WordCanvas

gen = WordCanvas(output_size=(64, 1024)) # Height 64, Width 1024
img = gen(text)
print(img.shape)
# >>> (64, 1024, 3)

If the set size is smaller than the text image size, the text image will automatically scale.
This means the text will be squeezed together, becoming a long, thin rectangle, for example:
from wordcanvas import WordCanvas

text = '你好' * 10
gen = WordCanvas(output_size=(64, 512))  # Height 64, Width 512
img = gen(text)

Adjust Background Color
Use the background_color parameter to change the background color.
from wordcanvas import WordCanvas

gen = WordCanvas(background_color=(255, 0, 0)) # Red background
img = gen(text)

Adjust Text Color
Use the text_color parameter to adjust the text color.
from wordcanvas import WordCanvas

gen = WordCanvas(text_color=(0, 255, 0)) # Green text
img = gen(text)

Adjust Text Alignment
Remember the image size we mentioned earlier?
By default, setting text alignment is meaningless. When drawing the image, there must be extra space around the text image to see the alignment effect.
Use the align_mode parameter to adjust the text alignment mode.
from wordcanvas import AlignMode, WordCanvas

gen = WordCanvas(
    output_size=(64, 1024),
    align_mode=AlignMode.Center
)

text = '你好! Hello, World!'
img = gen(text)
-
Center Alignment:
AlignMode.Center
-
Right Alignment:
AlignMode.Right
-
Left Alignment:
AlignMode.Left
-
Scatter Alignment:
AlignMode.Scatter tip
tipIn scatter alignment mode, not every character is scattered individually; instead, it is done by words. In Chinese, the word unit is a single character, and in English, it is a space.
For example, the input text "你好! Hello, World!" would be split into:
- ["你", "好", "!", "Hello,", "World!"]
After ignoring the spaces, it is then scattered.
Also, when the input text can only be split into one word, scatter alignment for Chinese words is equivalent to center alignment, while English words will be split into individual characters and then scattered.
The logic we use is:
def split_text(text: str):
    """ Split text into a list of characters. """
    pattern = r"[a-zA-Z0-9\p{P}\p{S}]+|."
    matches = regex.findall(pattern, text)
    matches = [m for m in matches if not regex.match(r'\p{Z}', m)]
    if len(matches) == 1:
        matches = list(text)
return matcheswarningThis is just a simple implementation and may not meet all requirements. If you have a more comprehensive solution for splitting strings, feel free to provide it.
Adjust Text Direction
Use the direction parameter to adjust the text direction.
-
Output Horizontal Text
from wordcanvas import AlignMode, WordCanvas

text = '你好!'
gen = WordCanvas(direction='ltr') # Left-to-right horizontal text
img = gen(text) -
Output Vertical Text
from wordcanvas import AlignMode, WordCanvas

text = '你好!'
gen = WordCanvas(direction='ttb') # Top-to-bottom vertical text
img = gen(text) -
Output Vertical Text with Scatter Alignment
from wordcanvas import AlignMode, WordCanvas

text = '你好!'
gen = WordCanvas(
    direction='ttb',
    align_mode=AlignMode.Scatter,
    output_size=(64, 512)
)
img = gen(text)
Adjust Output Direction
Use the output_direction parameter to adjust the output direction.
The use case for this parameter is: when you choose "vertical text output" but want to view the text image horizontally, this parameter can be used.
-
Vertical Text, Horizontal Output
from wordcanvas import OutputDirection, WordCanvas

gen = WordCanvas(
    direction='ttb',
    output_direction=OutputDirection.Horizontal
)

text = '你好!'
img = gen(text) -
Horizontal Text, Vertical Output
from wordcanvas import OutputDirection, WordCanvas

gen = WordCanvas(
    direction='ltr',
    output_direction=OutputDirection.Vertical
)

text = '你好!'
img = gen(text)
Compress Text
For some scenarios, the text may appear particularly compressed. In such cases, use the text_aspect_ratio parameter.
from wordcanvas import WordCanvas

gen = WordCanvas(
    text_aspect_ratio=0.25, # Text height / Text width = 1/4
    output_size=(32, 1024),
)  # Compressed text

text="Compression Test"
img = gen(text)

Note that when the compressed text size is larger than output_size, the image will enter an automatic scaling process. Therefore, you may have compressed the text but it gets scaled back, resulting in no visible effect.
Text Stroke
Use the stroke_width parameter to adjust the text stroke width.
from wordcanvas import WordCanvas

gen = WordCanvas(
    font_size=64,
    text_color=(0, 0, 255), # Red text
    background_color=(255, 0, 0), # Blue background
    stroke_width=2, # Stroke width
    stroke_fill=(0, 255, 0), # Green stroke
)

text="Text Stroke Test"
img = gen(text)

Using stroke_width may trigger a warning:
Using `stroke_width` may cause an OSError: array allocation size too large error with certain text.
This is a known issue with the `Pillow` library (see https://github.com/python-pillow/Pillow/issues/7287) and cannot be resolved directly.
As we found in testing, using stroke_width with Pillow can intermittently cause an OSError. This is a known issue with Pillow, and the related issue link is provided in the warning for you to review.
Multi-line Text
Use the \n newline character to create multi-line text.
from wordcanvas import WordCanvas

gen = WordCanvas()

text = '你好!\nHello, World!'
img = gen(text)

With multi-line text, you can combine it with most of the features mentioned above, for example:
from wordcanvas import WordCanvas, AlignMode

gen = WordCanvas(
  text_color=(0, 0, 255), # Red text
  output_size=(128, 512), # Height 128, Width 512
  background_color=(0, 0, 0), # Black background
  align_mode=AlignMode.Center, # Center alignment
  stroke_width=2, # Stroke width
  stroke_fill=(0, 255, 0), # Green stroke
)

text = '你好!\nHello, World!'
img = gen(text)

The following situations do not support multi-line text:
-
align_modedoes not supportAlignMode.Scattergen = WordCanvas(align_mode=AlignMode.Scatter) -
directiondoes not supportttbgen = WordCanvas(direction='ttb')
If you need these features, do not use multi-line text.
Dashboard
The basic functionality has been covered.
Lastly, let's introduce the dashboard feature.
from wordcanvas import WordCanvas

gen = WordCanvas()
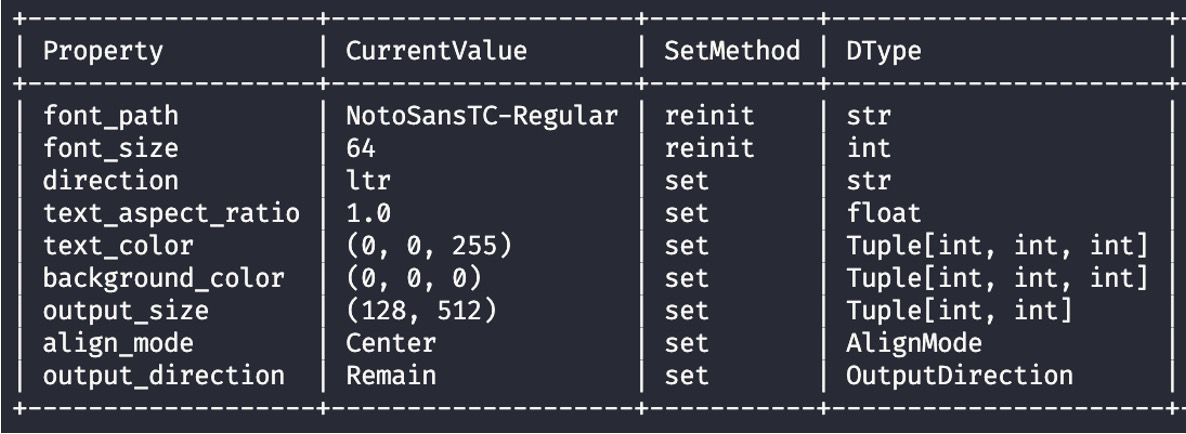
print(gen)
You can also omit print and just output directly since we have implemented the __repr__ method.
The output will display a simple dashboard.

You can see:
- The first column is Property, which lists all the setting parameters.
- The second column is Current Value, showing the current value of each parameter.
- The third column is SetMethod, which tells how the parameter is set.
- Parameters with
setcan be directly modified; - Parameters with
reinitneed to reinitialize theWordCanvasobject.
- Parameters with
- The fourth column is DType, showing the data type of the parameter.
- The fifth column is Description, which provides a description of the parameter (not displayed in the image to save space).
Most parameters can be directly set, which means you don't need to create a new object to modify the output features. For parameters that require reinit, it typically involves initializing font-related settings, such as font_size.
gen.output_size = (64, 1024)
gen.text_color = (0, 255, 0)
gen.align_mode = AlignMode.Center
gen.direction = 'ltr'
gen.output_direction = OutputDirection.Horizontal
After setting these, simply call the function again to get the new text image. Additionally, if you modify any reinit parameters directly, you will encounter the following error:
-
AttributeError: can't set attribute
gen.font_size = 128
# >>> AttributeError: can't set attribute
Of course, you can still forcefully change the parameters, and as a fellow Python user, I can't stop you:
gen._font_size = 128
However, this will cause errors when generating the image later!
Don't insist, just reinitialize a new object.
Summary
Many features are not covered, but the basic functionality has been introduced.
This concludes the basic usage of the project. In the next chapter, we will introduce advanced features.